Updated: September 16, 2026 · 33 min read
Good watercolor painting ideas do more than name a subject. They tell you how wet the paper should be, how strong to mix the paint, when to stop, and what to do if the wash goes wrong. This guide includes 15 complete exercises and 25 quick prompts, from a first wet-on-wet wash to glazing, granulation, negative painting, lifting, salt texture, and dry brush.
Start with the exercise that matches the kind of control you want to practice. Glossy paper is best for soft movement. Damp paper gives you controlled diffusion. Bone-dry paper is necessary for crisp glazes, clean negative edges, and broken dry-brush marks.
Table of Contents
- How to choose a watercolor exercise
- Eight foundational watercolor ideas with materials and steps
- Wet-on-wet wash for learning pigment movement
- Graded sky wash for controlling dilution
- Transparent circle glazing for clean color mixing
- Lifting soft clouds from a damp wash
- Negative-painted leaf for edge control
- Wet-into-damp botanical leaf study
- Three-value mountain landscape for atmospheric depth
- Controlled-accident journal wash for composition
- Seven focused watercolor technique studies
- Wet-on-wet cloud study with reserved paper
- Salt texture wash with timed crystal blooms
- Dry-brush feather for broken texture
- Granulating shoreline for natural stone texture
- Layered citrus glazing for luminous color
- Negative-painted wildflower for layered space
- Lifted rain window for selective highlights
- 25 more watercolor painting ideas for quick practice
- Watercolor video tutorials worth watching
- How to pick one idea instead of overplanning
- Finished the painting? What to do with it
- FAQ
How to choose a watercolor exercise
Choose by paper state rather than subject. If you want to see color move, choose a wet-on-wet wash or cloud study. If you want to practice timing, choose lifting or salt. If you want sharper control, choose glazing, negative painting, or dry brush. Granulation sits between the two: water moves the pigment, but the paper texture helps decide where the particles settle.
For every exercise, mix more paint than you think you need before the first stroke. A wash often fails because the painter stops to remix halfway through, not because the brushwork was poor. Ratios below are approximate parts by volume. A 4:1 water-to-pigment mix should look like weak tea; 2:1 is closer to whole milk; 1:1 is a dark, creamy accent mixture.
Eight foundational watercolor ideas with materials and steps
These eight projects keep the strongest ideas from the original guide and develop them into repeatable lessons. Work on a small quarter sheet or an A5 sheet unless a different size is given. Tape the paper to a rigid board if you plan to wet most of the surface.
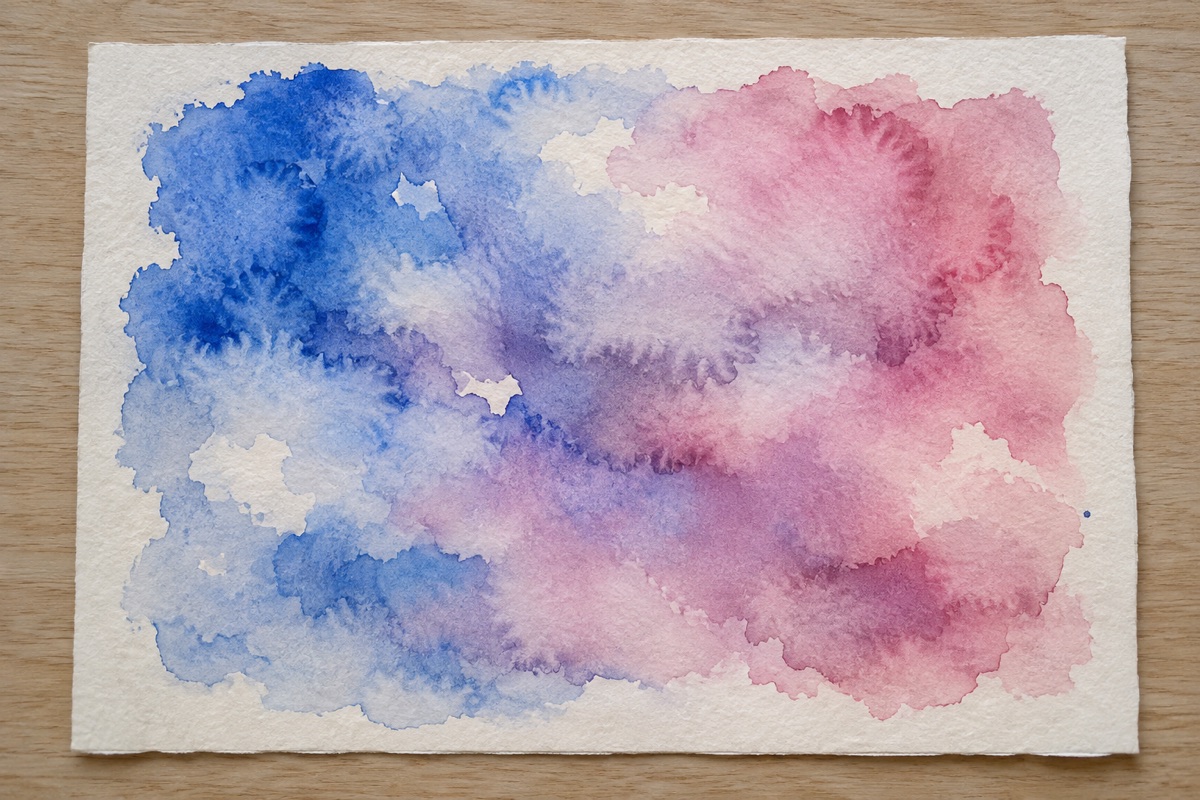
1. Wet-on-wet wash for learning pigment movement
Things you'll learn: How an evenly glossy sheet lets two pigments merge without turning into uncontrolled puddles.
Time: 15 minutes to paint, plus 25 to 40 minutes of drying.
Materials: A5 or 7 x 10 inch, 300 gsm cold-press watercolor paper; a size 12 pointed round brush; Ultramarine Blue and Quinacridone Rose; a mixing palette, clean water, board, low-tack tape, and paper towel.
- Prepare an even water layer. Tape the sheet down, then use clean water and the size 12 brush to wet the painting area twice. Wait 20 to 30 seconds until the paper is evenly glossy with no standing puddles. This matters because a puddle carries pigment to one edge, while patchy moisture creates hard, accidental seams.
- Mix two generous puddles at about 5:1 water to pigment. The mixtures should look like strong tea and flow easily from the brush. Place Ultramarine Blue on one side and Quinacridone Rose on the other, leaving several pale gaps. A lighter mixture gives the pigments room to meet without immediately becoming a dense violet.
- Let water do the blending. While the page is still glossy, tilt the board once toward the center and once back. Add only one small 2:1 pigment-rich touch where you want the darkest value. The tilt encourages broad movement, while the stronger touch creates a focal area without brushing the colors into mud.
- Stop as the shine turns satin. Blot any heavy bead at the lower edge, then leave the page flat and untouched. New strokes on satin-damp paper create cauliflower blooms because the added water pushes into paint that has already started to settle.
Failure mode and recovery: If all the color rushes to one edge, the page had a puddle or stayed tilted too long. Lay it flat and touch the corner of a dry brush or paper towel to the pooled bead. If a hard bloom appears after drying, do not scrub it. Rewet the entire wash evenly, add one very pale 8:1 glaze over the area, and let the new layer make the bloom feel intentional.
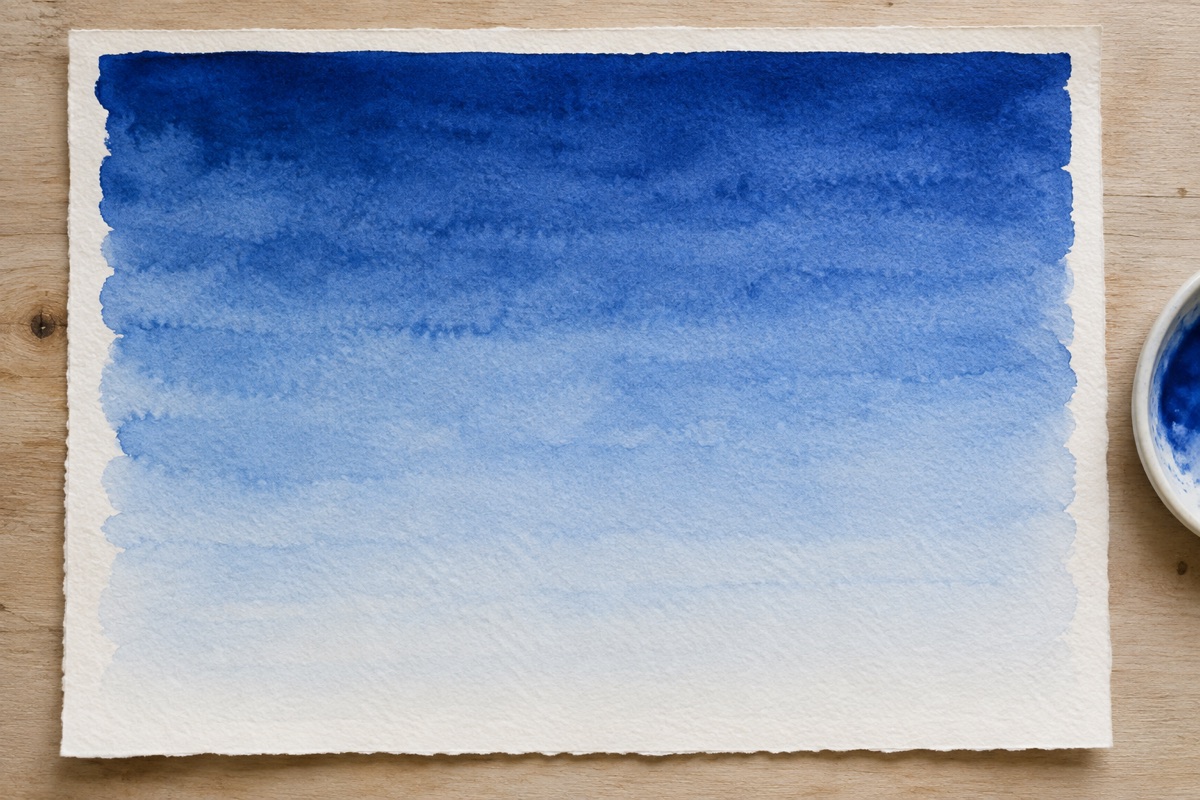
2. Graded sky wash for controlling dilution
Things you'll learn: How to make one color fade smoothly by changing the water ratio while keeping a moving wet edge.
Time: 20 minutes to paint, plus 30 minutes of drying.
Materials: 8 x 10 inch, 300 gsm cold-press paper; a 1 inch flat wash brush or size 14 mop; Ultramarine Blue and Cobalt Blue so you can test which moves more evenly; two water containers, a palette with a large well, board, and tape.
- Choose and mix one blue. Test both pigments on scrap paper, then use only one for the study. Mix about two tablespoons at 3:1 water to pigment. Preparing enough paint prevents a mid-wash remix, which almost always makes a stripe.
- Set the angle and first band. Tape the paper to a board and raise its top edge about 2 inches. On dry paper, load the flat brush fully and paint one horizontal stroke across the top. A slight tilt creates a bead along the lower edge, and that bead keeps the next stroke connected.
- Dilute in measured steps. Add roughly one brushful of clean water to the palette puddle after every stroke. Overlap the lower third of the previous band while it is still glossy. The working edge should stay wet, but the unpainted paper below stays dry until the brush reaches it. This controlled bead is what prevents separate horizontal bars.
- Finish with nearly clear water. For the final two bands, use about 10:1 water to pigment, then a brush rinsed and blotted once. Lay the board flat as soon as the last stroke is complete. Flattening stops the darkest paint from continuing to travel downward.
Failure mode and recovery: Parallel dark stripes mean the previous edge dried before the next stroke arrived, or the brush did not carry enough liquid. While the page is still glossy, pass a clean damp flat brush once across the seam. If the stripe is already dry, let everything dry fully and add a very pale 10:1 glaze from the top down. Do not spot-correct a dry stripe because it will create a second edge.
3. Transparent circle glazing for clean color mixing
Things you'll learn: How dry transparent layers create secondary colors without mixing all three pigments in the palette.
Time: 35 to 50 minutes, including drying between circles.
Materials: 9 x 12 inch, 300 gsm hot-press or fine cold-press paper; a size 8 pointed round brush; Transparent Yellow, Quinacridone Rose, and Phthalo Blue Green Shade; pencil, compass or round template, palette, and hair dryer on a cool setting if needed.
- Draw three light overlapping circles. Keep pencil pressure low and make each circle overlap the other two. The paper must be bone-dry. Clear boundaries make it easy to see whether the later colors are glazing cleanly or disturbing the first layer.
- Paint the yellow circle at about 6:1 water to pigment. Work on dry paper and keep a small wet bead moving around the shape. The circle should be transparent enough to see the paper through it. A pale first layer preserves luminosity when two or three layers overlap.
- Dry completely, then add rose. The yellow should feel room temperature, not cool, before the 6:1 Quinacridone Rose wash crosses it. A cool sheet still contains moisture, and painting over it will soften the overlap edge instead of creating a clean orange glaze.
- Dry again and add blue. Use Phthalo Blue at about 8:1 because it is highly staining and strong. Paint one confident layer, then leave it alone. The yellow overlap should read green, the rose overlap violet, and the center should become a restrained neutral rather than black.
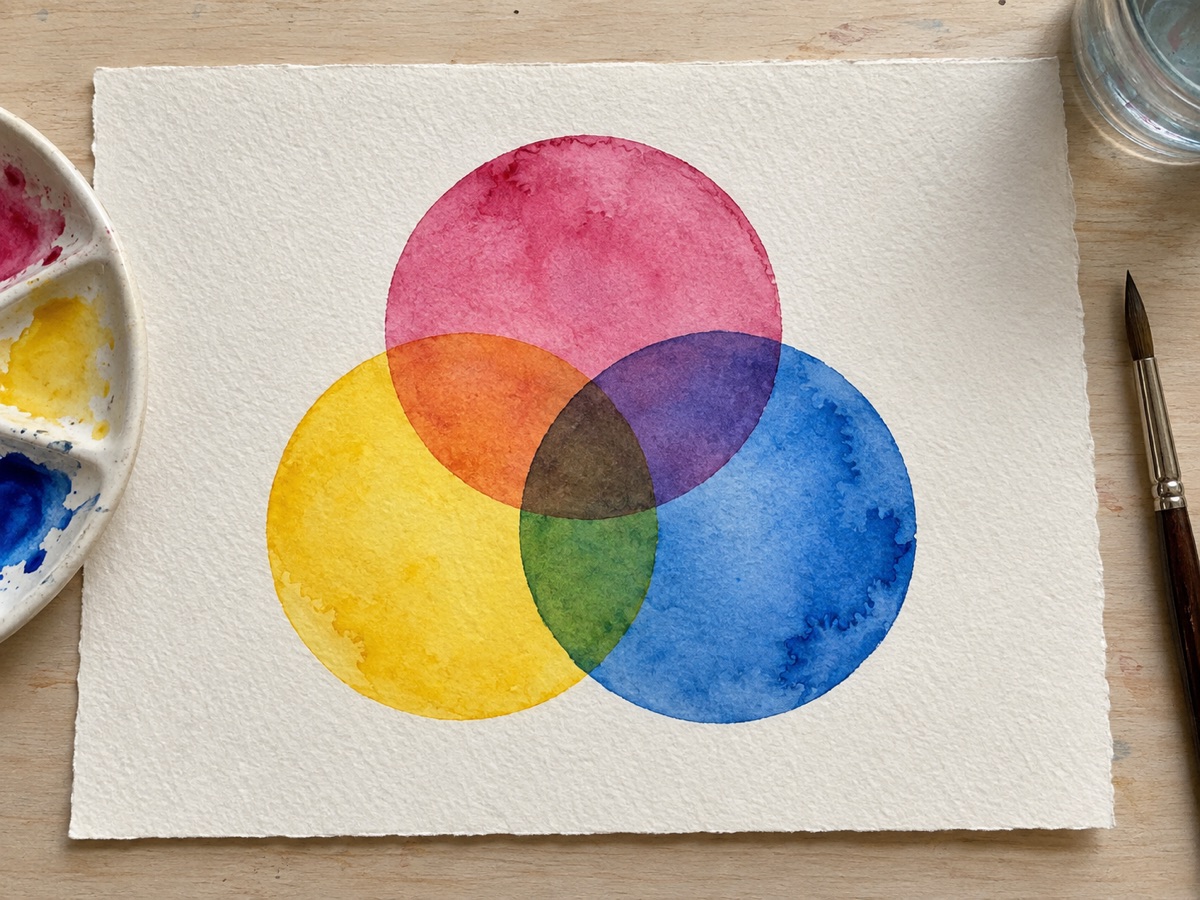
Failure mode and recovery: Fuzzy intersections mean the lower layer was not dry. Stop, let the page dry, and redefine only the outside edge with a matching 8:1 glaze. A muddy center usually means the brush scrubbed through earlier layers. Leave it as a record of overworking and repeat the exercise smaller beside it, using one stroke around each overlap.
4. Lifting soft clouds from a damp wash
Things you'll learn: How to remove pigment during the short damp stage when highlights can be lifted without producing torn paper or harsh white holes.
Time: 25 minutes to paint, plus 30 minutes of drying.
Materials: 8 x 10 inch, 300 gsm cold-press paper; a size 14 mop and a clean size 8 round brush; Ultramarine Blue and Burnt Sienna; soft white paper towel, palette, board, tape, and two water containers.
- Mix a blue-gray wash. Combine Ultramarine Blue and Burnt Sienna, then dilute to about 5:1 water to pigment. Test it on scrap paper. The mixture should dry lighter than it looks in the palette, which leaves room for a darker cloud underside later.
- Paint the sky on evenly wet paper. Wet the upper two-thirds until glossy but not puddled, then sweep in the blue-gray with the mop. Leave it untouched until the surface changes from mirror-like gloss to a soft satin sheen. Lifting during full gloss makes the wash immediately flow back into the light area.
- Lift the cloud masses. Press a loosely crumpled paper towel into three irregular shapes and lift straight up. Rinse the size 8 brush, blot it until only damp, and pull along selected lower edges. The towel creates broken cloud tops while the damp brush makes a softer underside.
- Add one restrained shadow. When the paper is barely damp, use a 3:1 blue-gray mix beneath the largest cloud. The limited shadow gives volume. Stop before adding outlines, because clouds depend on edge changes rather than drawn contours.
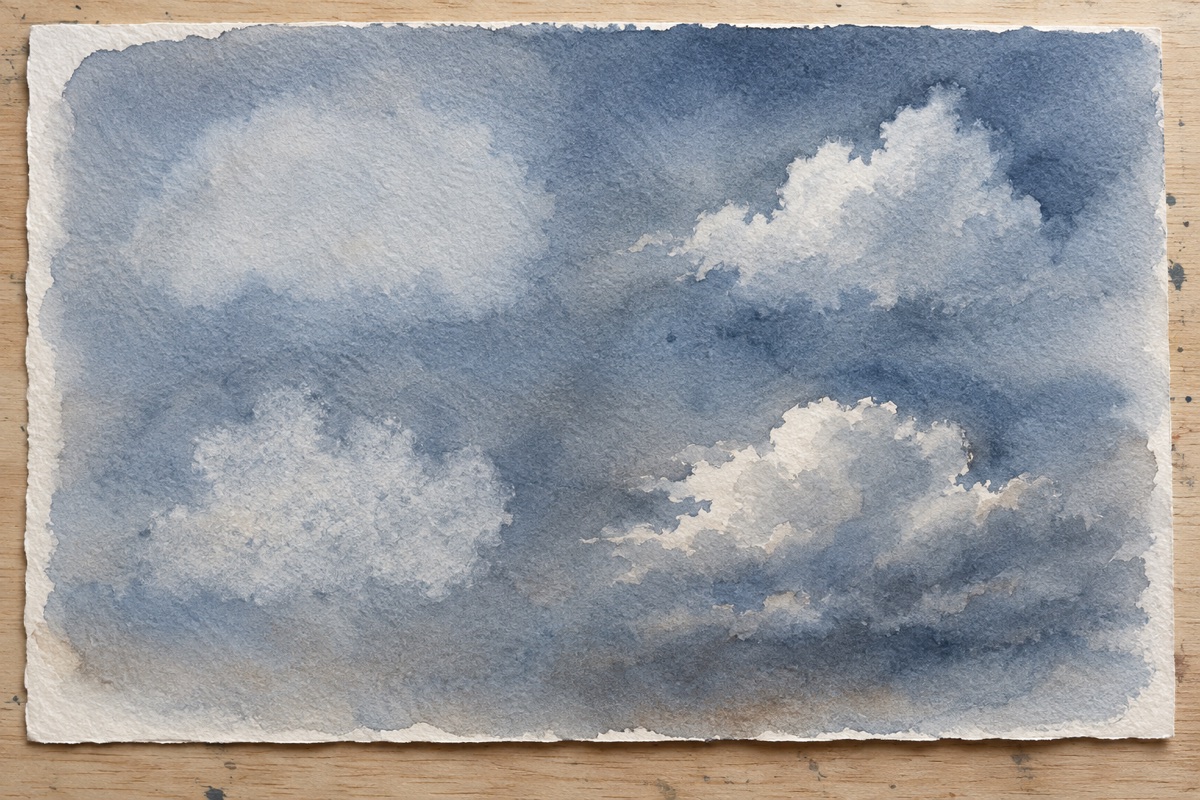
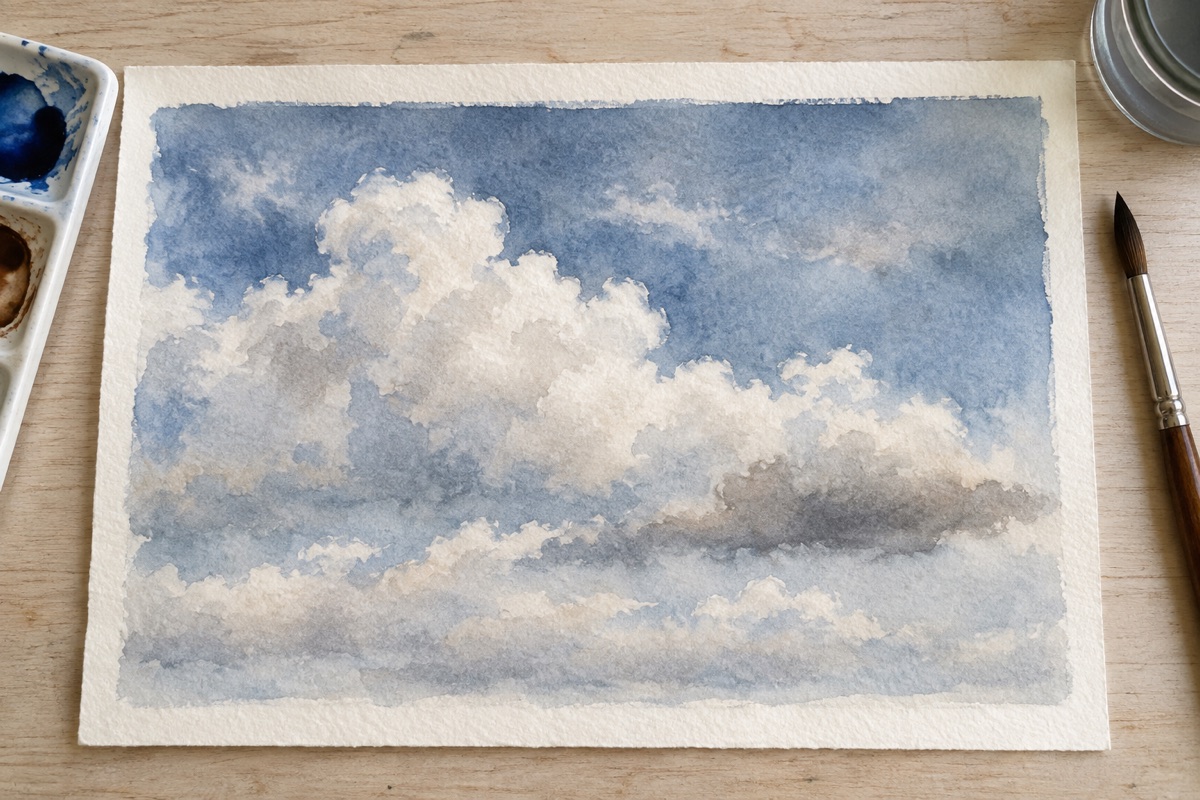
Failure mode and recovery: If the lifted area fills back in, the page was too wet. Wait another minute, blot the towel on clean paper, and lift again once. If lifting leaves rough, damaged fibers, the page was too dry or the brush scrubbed. Stop working that spot. After drying, soften the damaged edge with a pale 10:1 sky glaze around it, not across the light cloud.
5. Negative-painted leaf for edge control
Things you'll learn: How painting the space around a subject creates a crisp silhouette while layered background washes build depth.
Time: 50 to 70 minutes, including two full drying breaks.
Materials: 8 x 10 inch, 300 gsm cold-press paper; a size 8 pointed round and size 4 pointed round; Sap Green, Ultramarine Blue, and Burnt Sienna; a simple leaf reference, HB pencil, palette, board, and tape.
- Draw one simple leaf and stem. Use a clear outer contour with no interior detail. Keep the paper bone-dry. A simple silhouette lets you concentrate on the negative boundary instead of correcting a complicated drawing with the brush.
- Wet only the background. Use clean water around the leaf, stopping about 2 mm from the pencil edge. Then bridge that final gap with the pointed tip. The background should be glossy, while the leaf stays completely dry. This prevents water from crossing the outline and staining the reserved paper.
- Drop in a varied 6:1 background. Use Sap Green, then touch in Ultramarine Blue and Burnt Sienna without mixing them smooth. Guide paint up to the leaf edge with the size 4 brush. Variations keep the background alive, while the sharp wet-to-dry boundary defines the leaf.
- Dry fully and deepen selected areas. Add a second 5:1 glaze behind only two or three leaf edges, leaving other areas pale. Once dry, place a very light 10:1 Sap Green wash inside the leaf and add one main vein. Uneven background value makes the pale shape feel dimensional.
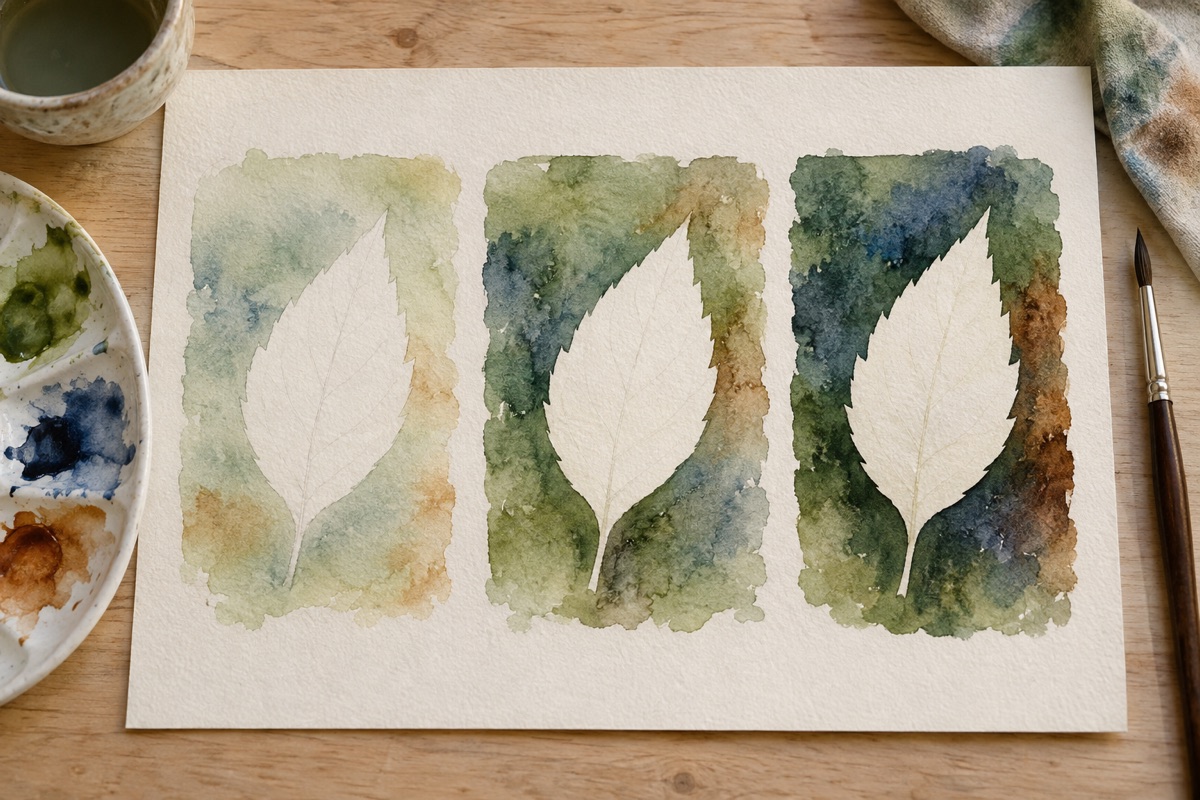
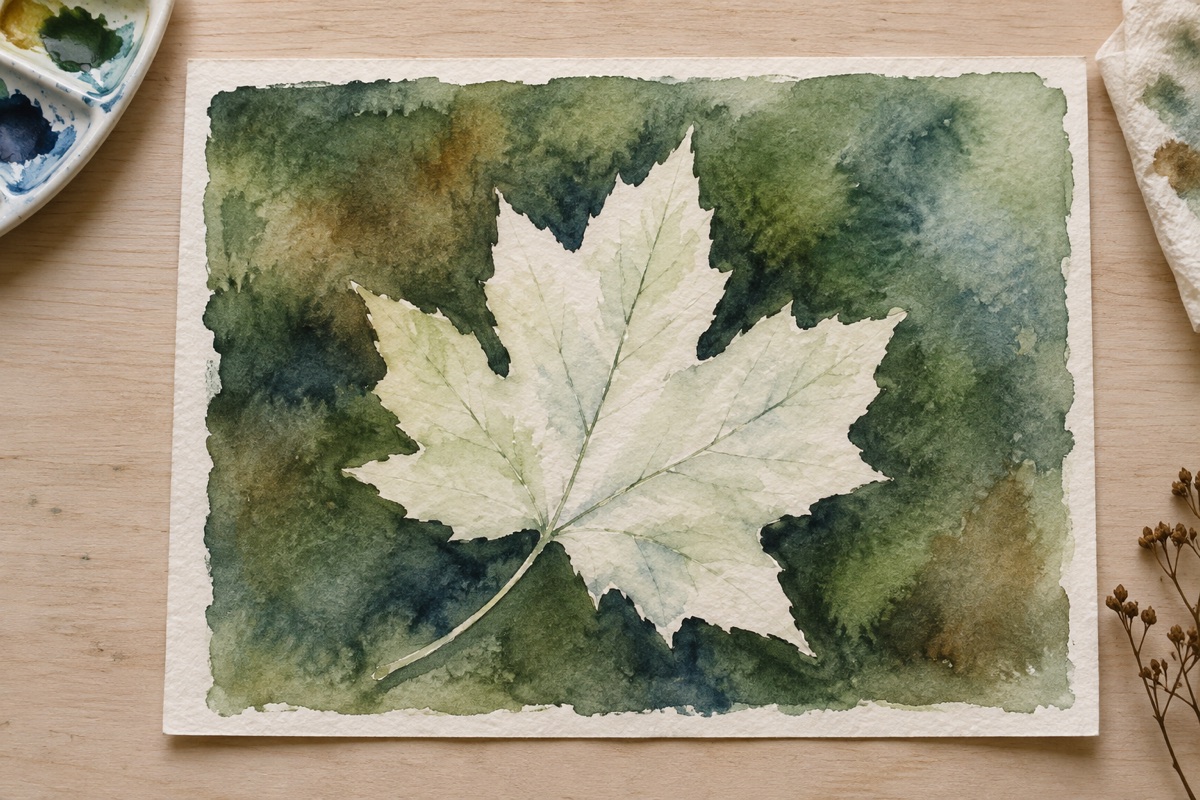
Failure mode and recovery: A green notch inside the leaf means water or paint crossed the contour. Blot immediately with the corner of a clean towel. Once dry, gently lift the stain with a damp stiff brush, then make that edge a natural indentation in the leaf. If the whole outline looks equally dark and cut out, glaze a pale background wash over one section so part of the edge can recede.
6. Wet-into-damp botanical leaf study
Things you'll learn: How to place warm and cool color changes inside one leaf without losing its clean silhouette.
Time: 35 to 50 minutes, including drying.
Materials: 7 x 10 inch, 300 gsm cold-press paper; a size 8 pointed round and size 2 liner; Hansa Yellow Light, Ultramarine Blue, and Burnt Sienna; a real leaf or clear reference, HB pencil, palette, and paper towel.
- Simplify the drawing. On dry paper, draw the outer contour, main vein, and stem only. Ignore small serrations and secondary veins for now. A simple drawing preserves room for watercolor variation instead of trapping you in tiny outlined compartments.
- Mix three separate puddles. Prepare Hansa Yellow Light at 6:1 water to pigment, Ultramarine Blue at 8:1, and Burnt Sienna at 8:1. Keeping them separate lets the colors meet on the paper, where their transitions remain fresher.
- Lay the light base and wait for dampness. Paint the entire leaf with yellow on dry paper, maintaining a wet bead. Wait until the surface loses its gloss but still feels cool. Touch blue into two shadow areas and sienna near the tip or damaged edge. Damp paper allows a soft spread of about 5 to 10 mm instead of flooding the whole shape.
- Add only structural details when bone-dry. Use the liner and a 3:1 neutral mixed from Ultramarine and Burnt Sienna for the main vein, a few secondary veins, and two dark edge accents. The dry sheet holds the narrow marks, and limiting them keeps the color shifts more important than the linework.
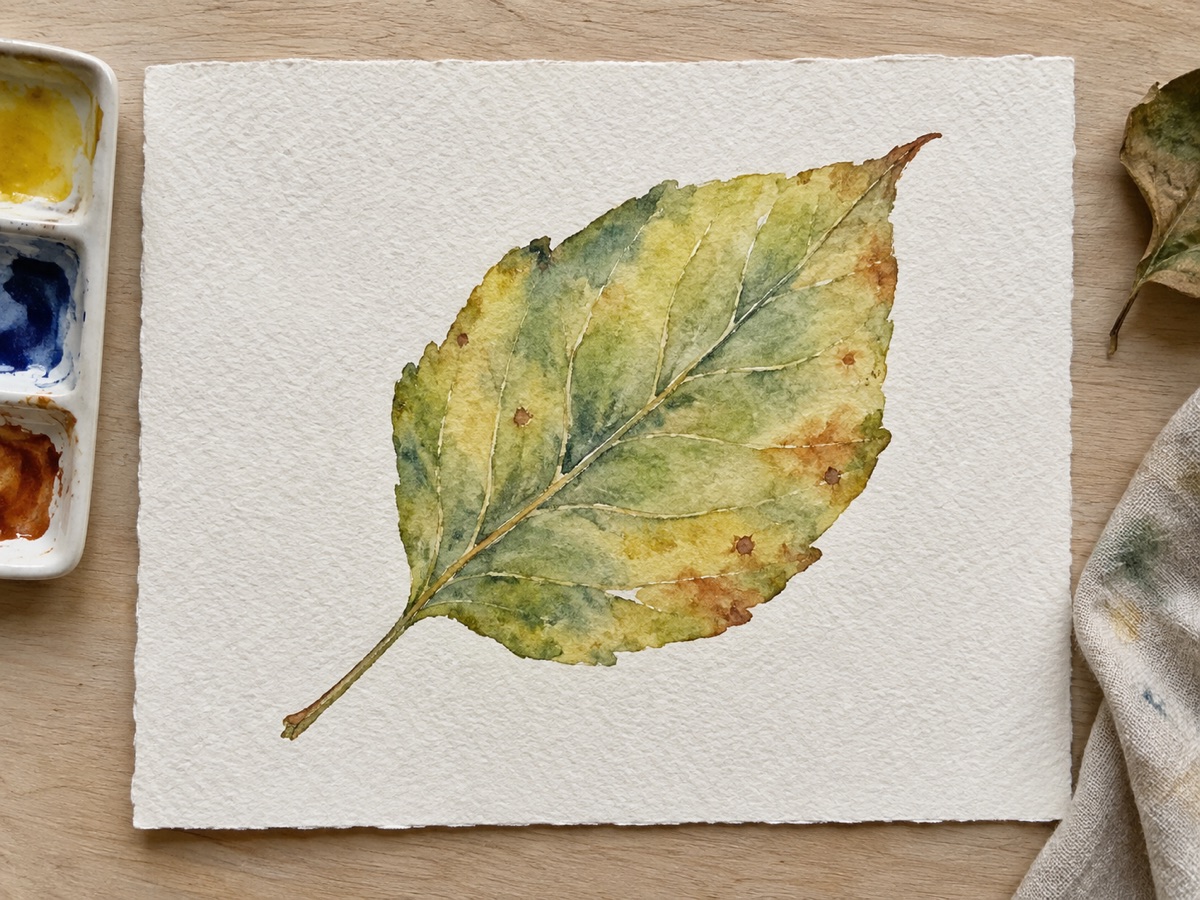
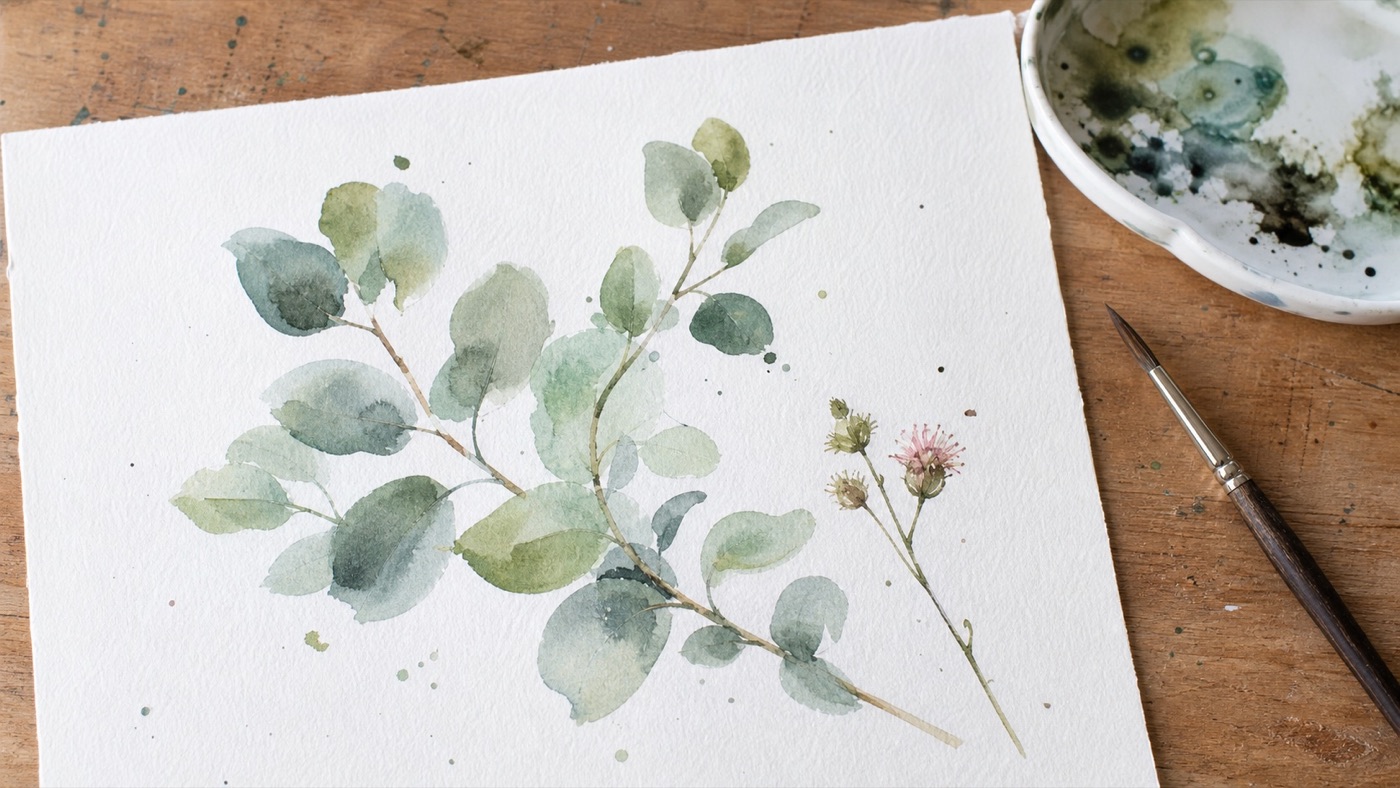
Failure mode and recovery: If the blue shoots through the entire leaf, the base was still glossy. Tilt the page so excess moisture collects at one edge, then lift the bead with a dry brush. If the veins look like a dark skeleton, soften every second line with a clean damp brush and glaze a 12:1 yellow wash over the most rigid area after it dries.
7. Three-value mountain landscape for atmospheric depth
Things you'll learn: How three clearly separated values create distance without detailed drawing or realistic color.
Time: 35 to 45 minutes, including drying between ridges.
Materials: 7 x 10 inch, 300 gsm cold-press paper; a size 10 pointed round; Ultramarine Violet and Cobalt Blue so you can choose one pigment for the study; scrap paper, palette, board, tape, and a hair dryer on cool if needed.
- Choose one pigment and mix three values. Prepare pale at 10:1 water to pigment, middle at 5:1, and dark at 2:1. Test all three on scrap and dry the marks. Watercolor dries lighter, so the dry tests confirm that each ridge will remain distinct.
- Paint the distant ridge on dry paper. Use the pale mixture, place the ridge high on the page, and keep its contour broad and simple. A light value and high placement make it recede. Let it become bone-dry before continuing so the next layer cannot bleed upward.
- Add the middle ridge. Use the 5:1 mixture and overlap the lower part of the first ridge. Keep this contour slightly more varied, but avoid individual trees. Greater contrast moves the ridge forward while the dry boundary preserves atmospheric separation.
- Place the foreground last. Use the 2:1 mixture for a low, dark silhouette. Add only a few tree-like interruptions near the sides. The darkest value anchors the painting, and limited detail prevents the foreground from becoming a distracting row of symbols.
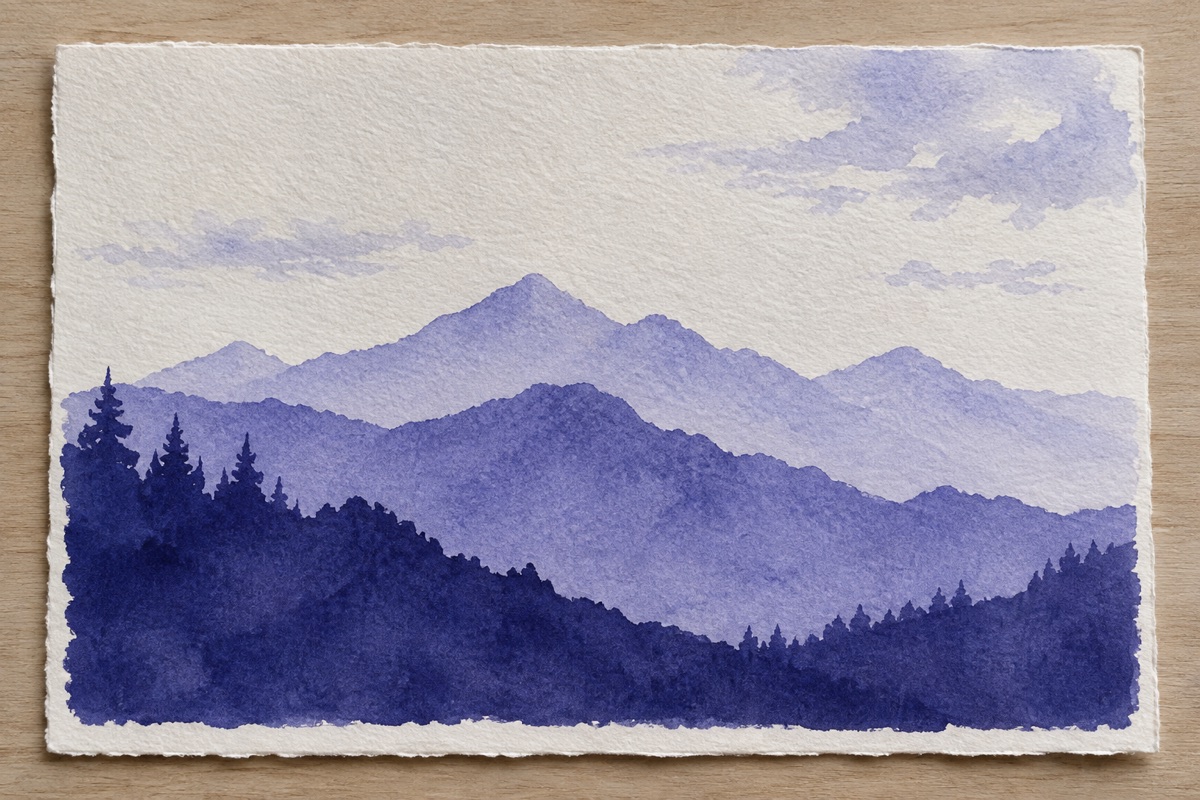
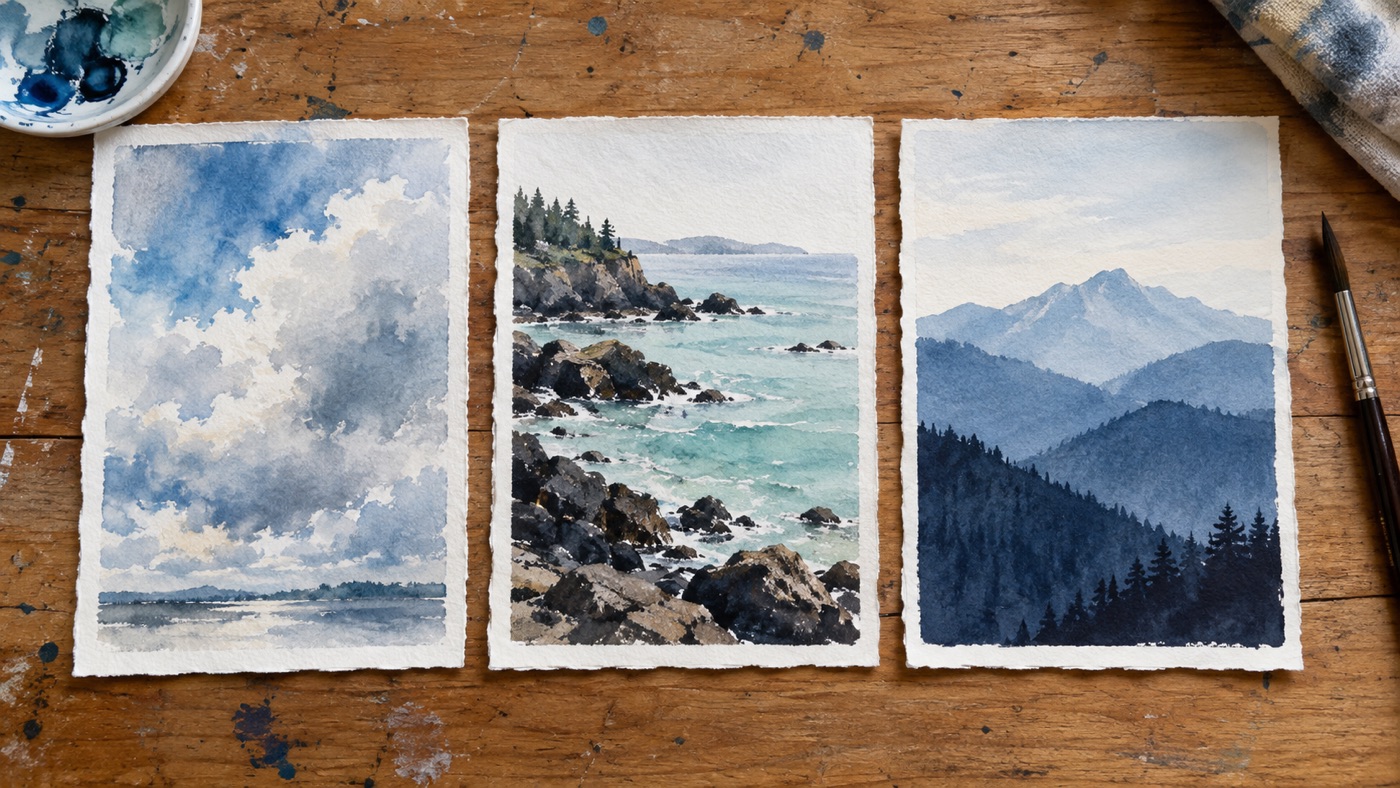
Failure mode and recovery: If two ridges merge, they are too close in value or the first was damp. Let the page dry, then glaze the nearer ridge once with the same 6:1 mixture. If a hard ridge looks pasted on, soften only a short section of its lower edge with a damp brush. Do not soften the full contour, or the value structure will disappear.
8. Controlled-accident journal wash for composition
Things you'll learn: How to respond to an unpredictable bloom with a small number of deliberate marks instead of painting over it.
Time: 20 minutes to paint, plus 20 to 30 minutes of drying.
Materials: 200 to 300 gsm cold-press watercolor journal; a size 10 pointed round and size 4 rigger; Phthalo Turquoise, Burnt Sienna, and Neutral Tint; palette, clean water, and scrap paper.
- Wet an irregular shape. On one journal page, brush clean water into an off-center shape about the size of your hand. Leave holes and uneven edges. The paper should be glossy inside the shape and dry outside it. An imperfect boundary gives the accident something interesting to work against.
- Drop in two opposites at 6:1. Place Phthalo Turquoise into one side and Burnt Sienna into the other, allowing only part of the colors to meet. Tilt the journal once, then set it flat. Complementary colors create useful neutrals, but limited contact keeps the whole wash from becoming brown.
- Create one bloom on purpose. When the wash turns satin-damp, touch in one small drop of clean water and then stop. The drop pushes pigment outward and records how a backrun forms. Let the page dry completely before deciding what the shape suggests.
- Add exactly three organizing marks. Mix Neutral Tint at 2:1 and use the rigger on bone-dry paper. Add three lines, shapes, or accents that guide the eye across the wash. The limit forces each mark to solve a compositional problem instead of covering the accidental edges.
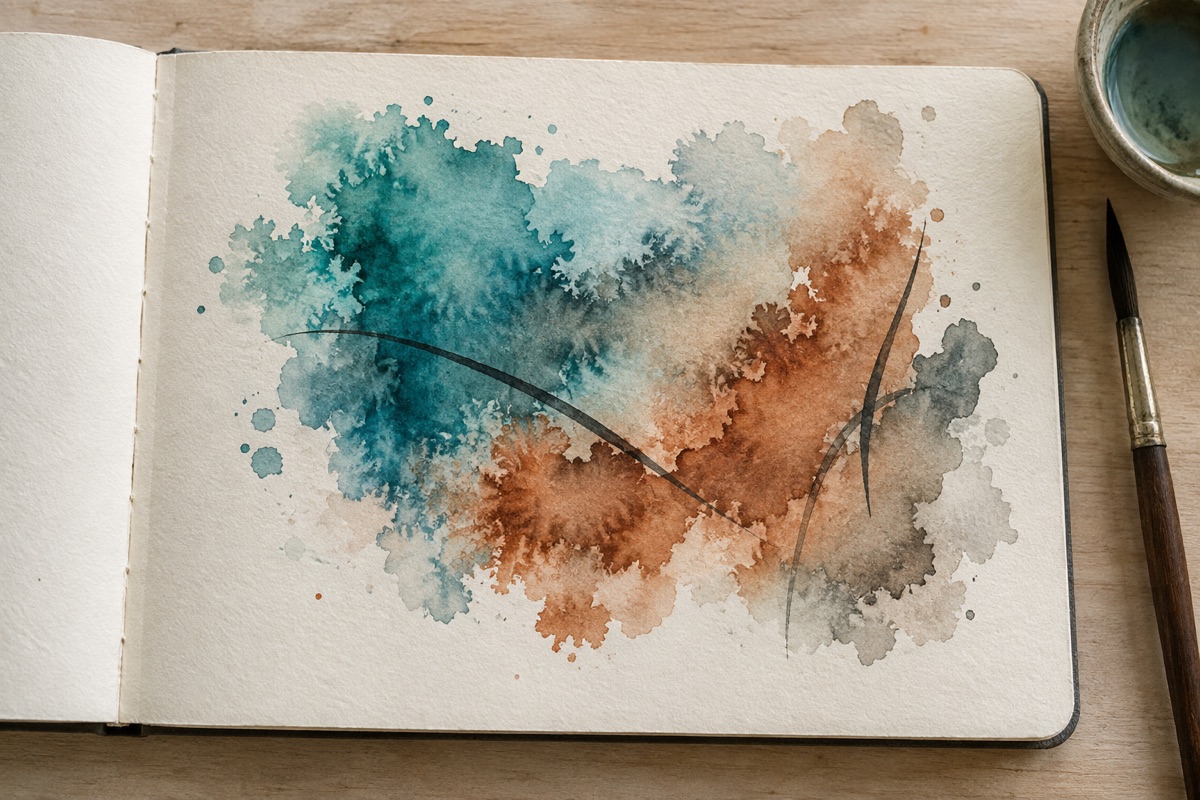
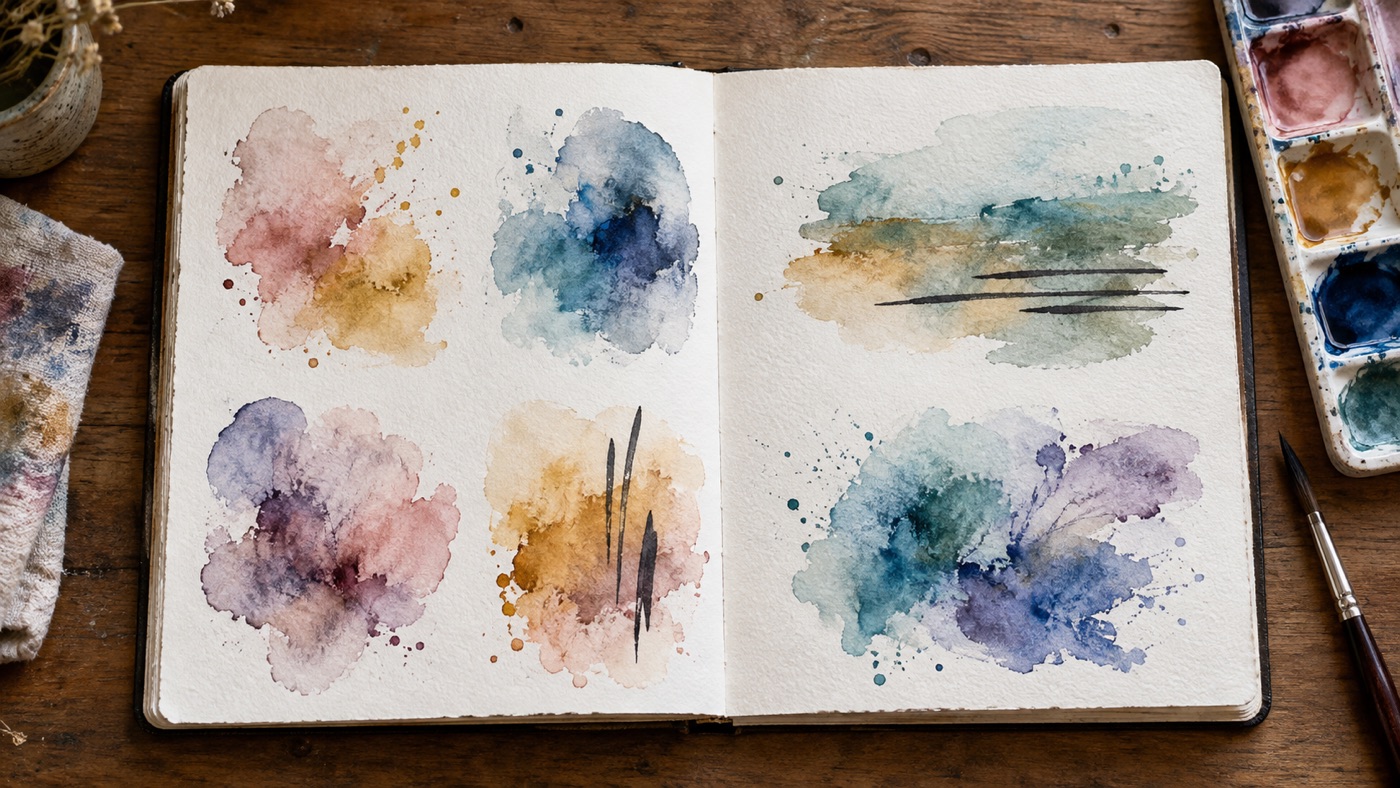
Failure mode and recovery: If the turquoise and sienna become one flat gray-brown area, too much brushing mixed the complements. Let it dry, then glaze a transparent 10:1 turquoise patch over one side to restore a color family. If the three dark marks dominate, soften one immediately with a damp brush, or crop the page later so the wash regains more visual weight.
Seven focused watercolor technique studies
The next seven projects take the strongest technique ideas that used to appear as one-line prompts and turn them into complete exercises. Several share a broad method with the first eight projects, but each changes the paper state, timing, or subject enough to teach a separate skill.
9. Wet-on-wet cloud study with reserved paper
Things you'll learn: How to shape soft clouds by painting around dry paper gaps while the surrounding sky diffuses on a glossy sheet.
Time: 20 to 30 minutes, plus drying.
Materials: 8 x 10 inch, 300 gsm cold-press paper; a size 14 mop and size 8 pointed round; Cobalt Blue, Indigo, and Quinacridone Rose; board, tape, palette, and paper towel.
- Plan three irregular light gaps. Do not draw cloud outlines. Simply identify one large and two small areas you will leave mostly untouched. Avoiding a pencil contour keeps the cloud edges varied rather than traced.
- Wet the sky around those gaps. Apply clean water across the sheet, skipping the brightest cloud centers but allowing water to enter parts of their edges. The sky should be evenly glossy, while the centers stay dry. This creates a mix of wet soft edges and dry crisp accents.
- Add a 6:1 Cobalt wash, then darker color. Sweep Cobalt Blue across the wet sky, guiding it around the reserved centers. Touch 4:1 Indigo into the upper corners and a very pale 12:1 Quinacridone Rose near two cloud undersides. Different strengths create depth without requiring linework.
- Unify only while glossy. Use a clean damp brush to connect any isolated blue patches, then stop when the shine turns satin. Continued brushing after that point creates streaks and replaces natural diffusion with scrubbed texture.
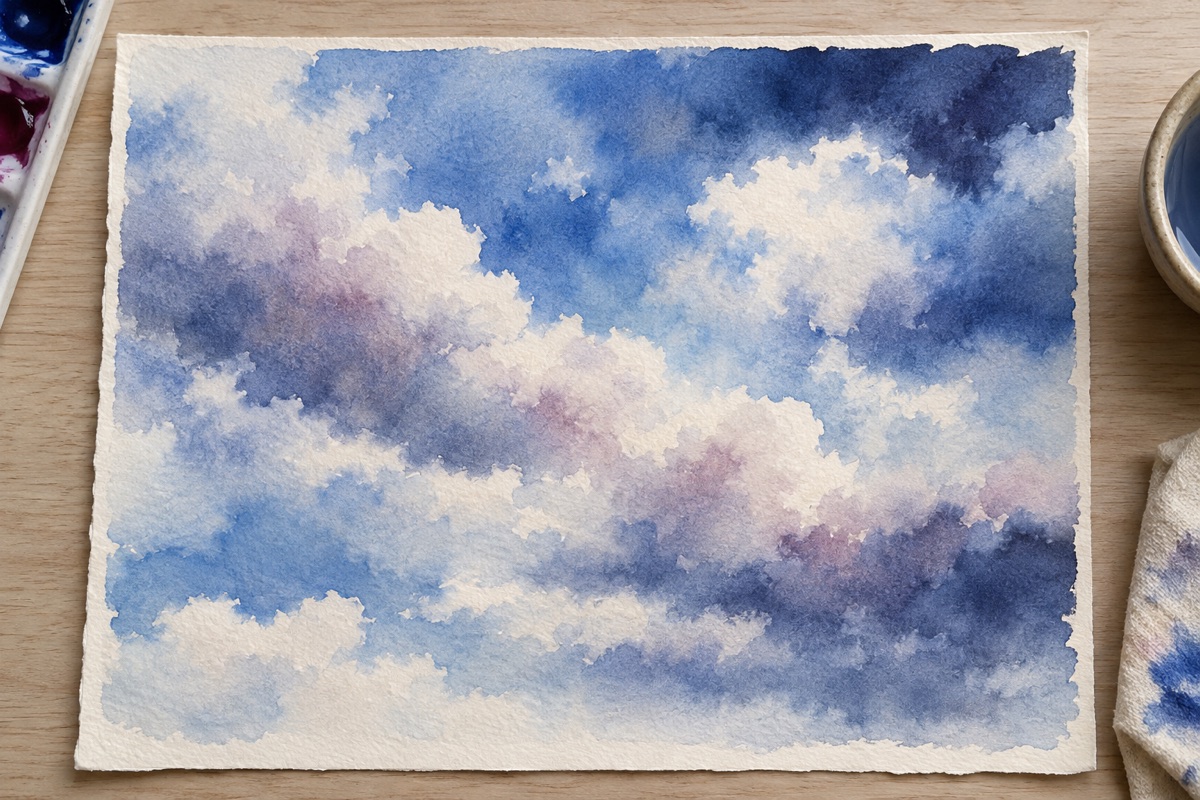
Failure mode and recovery: If every cloud edge is hard, too much paper stayed dry. After the first wash dries, rewet the sky and cross over selected edges with a 12:1 Cobalt glaze. If the clouds vanish because color flowed through every gap, lift one or two centers during the damp stage with a blotted brush. Accept smaller light shapes rather than trying to recover the original plan.
10. Salt texture wash with timed crystal blooms
Things you'll learn: How fine and coarse salt pull moisture at different rates, and why the damp stage matters more than the amount of salt.
Time: 15 minutes to paint, 45 to 90 minutes to dry, plus 5 minutes to remove salt.
Materials: 7 x 10 inch, 300 gsm cold-press paper; a size 12 mop; Indigo, Phthalo Blue Green Shade, and Quinacridone Rose; fine table salt, coarse salt, palette, board, and tape.
- Mix a dark but mobile wash. Prepare Indigo at 3:1 water to pigment and Phthalo Blue at 5:1. Make a small 10:1 Quinacridone Rose puddle for variation. The mixtures need enough water for crystals to draw moisture, but enough pigment to leave visible light marks.
- Paint a simple rectangular field. On dry paper, work quickly so the entire shape stays glossy. Blend the two blues loosely and touch rose into only two areas. A simple field makes the salt effect the subject rather than hiding it inside a complicated landscape.
- Wait for the satin stage, then salt. When the mirror-like shine disappears but the paper still looks damp, sprinkle fine salt over one area and coarse grains over another. Early salt dissolves into a wet puddle; late salt sits on dry pigment and does nothing. The satin stage gives both sizes time to pull water locally.
- Let it become bone-dry before brushing salt away. This may take an hour. Use dry fingers or a clean dry brush to remove the crystals. Wet removal smears concentrated pigment back across the pale marks and can abrade the paper.
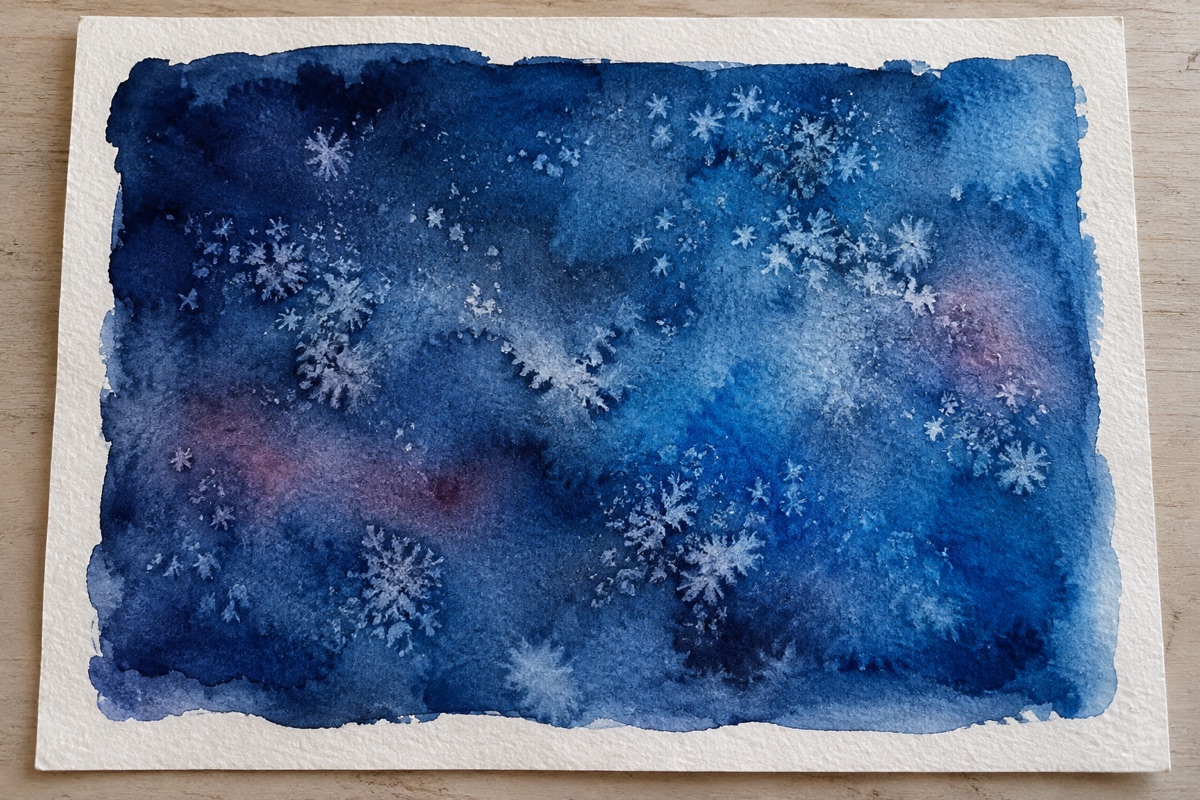
Failure mode and recovery: No texture means the wash was too dry when the salt landed. Do not add water over the crystals. Brush them off after drying, glaze a fresh 5:1 blue layer over part of the page, and try again at the satin stage. Large white holes mean too much coarse salt or very wet paper. Glaze those spots with an 8:1 blue after drying to reduce the contrast.
11. Dry-brush feather for broken texture
Things you'll learn: How a nearly dry brush skips across paper tooth to suggest feather barbs without drawing every strand.
Time: 25 to 35 minutes, with minimal drying time.
Materials: 7 x 10 inch, 300 gsm rough watercolor paper; a size 8 flat brush with a worn edge and size 2 rigger; Payne's Gray, Burnt Sienna, and Ultramarine Blue; paper towel, palette, and pencil.
- Draw the shaft and outer gesture. On bone-dry paper, draw one curved central shaft and a very light outer feather shape. The curve establishes movement, while the faint boundary prevents the broken strokes from becoming an unrelated patch of texture.
- Prepare paint with about 1:1 water to pigment. Mix separate small puddles of Payne's Gray, Burnt Sienna, and Ultramarine. Load the flat brush, then press it firmly into a paper towel once. The brush should feel cool and carry color, but it should not leave a wet bead.
- Drag outward from the shaft. Hold the flat brush low and pull quick tapered marks in the direction of the barbs. Keep the paper dry throughout. Rough texture catches pigment on raised fibers, creating broken marks that would disappear on wet paper.
- Add the shaft and a few dark accents. Use the rigger with a 2:1 Payne's Gray and Burnt Sienna neutral. Paint the shaft once, then deepen only three or four barb groups. Concentrated accents clarify the structure while most of the feather stays airy.
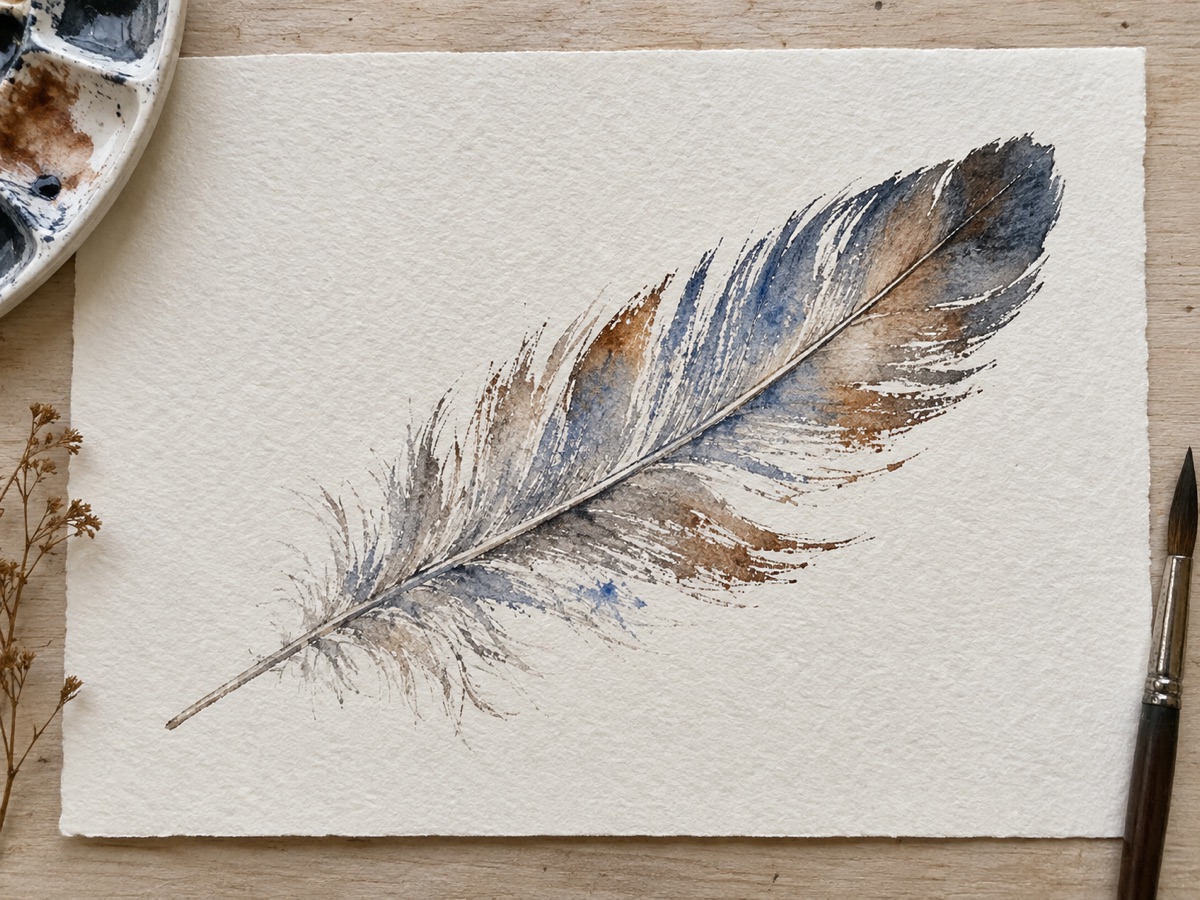
Failure mode and recovery: A solid stripe means the brush held too much water or sat too upright. Blot more firmly and test on scrap before continuing. If the feather looks stiff, break two outer edges with a clean damp brush, then add a few shorter dry strokes at different angles. Do not outline the whole silhouette, since that removes the texture's purpose.
12. Granulating shoreline for natural stone texture
Things you'll learn: How heavy pigment particles settle into rough paper and create stone texture with less brushwork.
Time: 45 to 60 minutes, including drying.
Materials: 9 x 12 inch, 300 gsm rough watercolor paper; a size 12 mop and size 6 pointed round; French Ultramarine, Burnt Sienna, and Cobalt Blue; board, tape, palette, spray bottle, and paper towel.
- Separate sky, water, and rocks with a simple drawing. Use one low horizon and three large rock groups. Keep the details out. Granulation reads best across broad shapes, while small outlined stones tempt you to paint texture manually.
- Paint the pale water first. On dry paper, lay a 10:1 Cobalt Blue wash across the water area and soften it with clean water. Let it dry to a matte but still slightly cool state. A quiet, less granulated water field gives the heavier rock texture something to contrast with.
- Mix granulating rock color on the paper. Use French Ultramarine and Burnt Sienna at about 3:1 water to pigment in separate puddles. Wet one rock group until satin-damp, then drop both colors into it without stirring. The heavier particles separate as water settles into the rough paper valleys.
- Encourage sediment, then add only a few edges. Tilt the board slightly, mist one area once, and leave it flat to dry. On bone-dry paper, use a 2:1 neutral mixture for a few crevices and contact shadows. The dark accents explain the rocks, while the settled pigment provides most of the surface information.
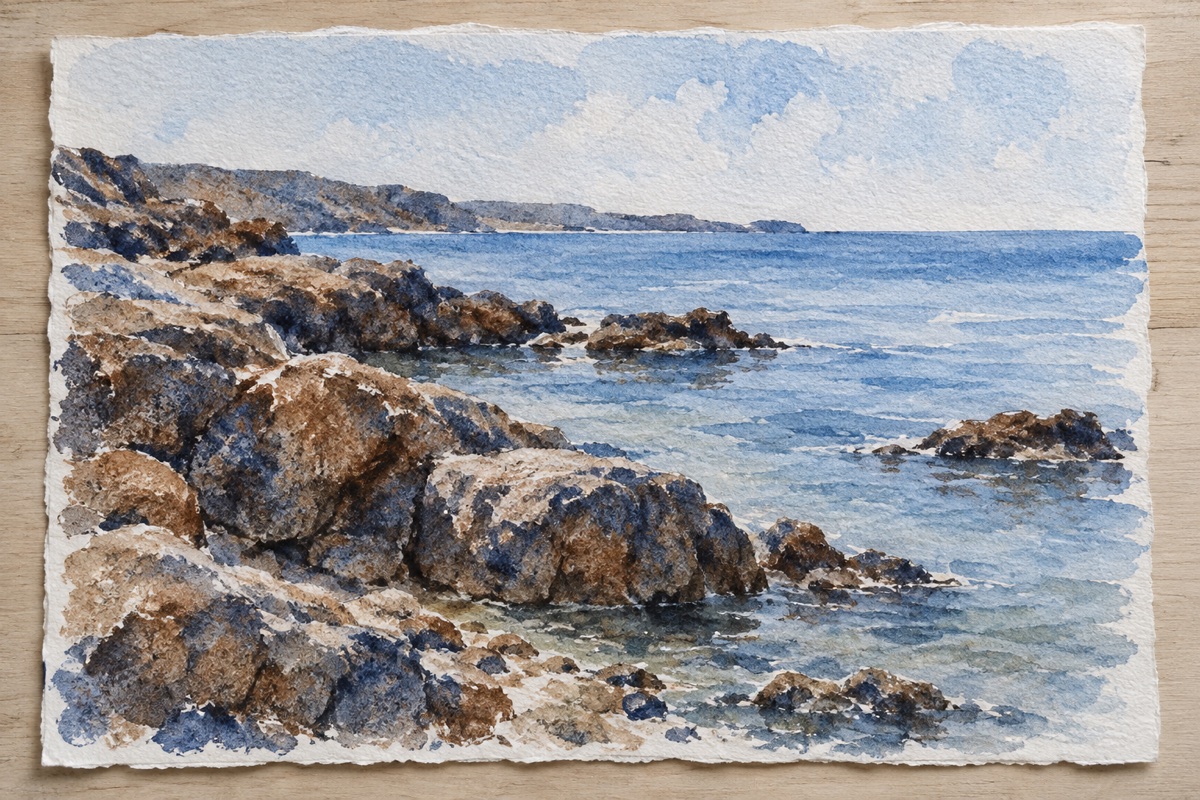
Failure mode and recovery: Smooth, flat rocks mean the pigment was overmixed or the paper was too smooth. While still damp, drop in unmixed French Ultramarine and leave it alone. If the result becomes speckled everywhere, glaze the water with a smooth 12:1 Cobalt wash after drying so the granulation remains concentrated in the rocks.
13. Layered citrus glazing for luminous color
Things you'll learn: How transparent layers deepen a citrus slice while clean drying breaks preserve white pith and glowing color.
Time: 50 to 70 minutes, including three drying stages.
Materials: 8 x 10 inch, 300 gsm hot-press or fine cold-press paper; a size 8 pointed round and size 4 pointed round; Transparent Yellow, Quinacridone Gold, and Pyrrol Scarlet; pencil, round template, palette, and hair dryer on cool if needed.
- Draw the slice simply. On dry paper, draw one circle, a smaller inner circle, and 8 to 10 wedge divisions. Leave narrow pith channels between wedges. These reserved gaps keep the subject readable after several transparent layers.
- Lay a pale yellow foundation. Use Transparent Yellow at 8:1 water to pigment across the fruit, skipping the outer paper margin and preserving the pith where possible. Let the page become bone-dry. A pale first layer supplies light that will shine through every later glaze.
- Glaze the wedge shapes. Mix Quinacridone Gold at 6:1 and paint each wedge separately on dry paper, leaving the pith gaps. Alternate wedges so adjacent wet shapes do not merge. This second layer builds local color while the dry boundaries keep the segments clear.
- Deepen selected overlaps only. After full drying, use Pyrrol Scarlet at 10:1 over three or four wedge edges and Quinacridone Gold at 3:1 around part of the rind. Selective third layers create depth. Covering every segment equally would flatten the slice again.
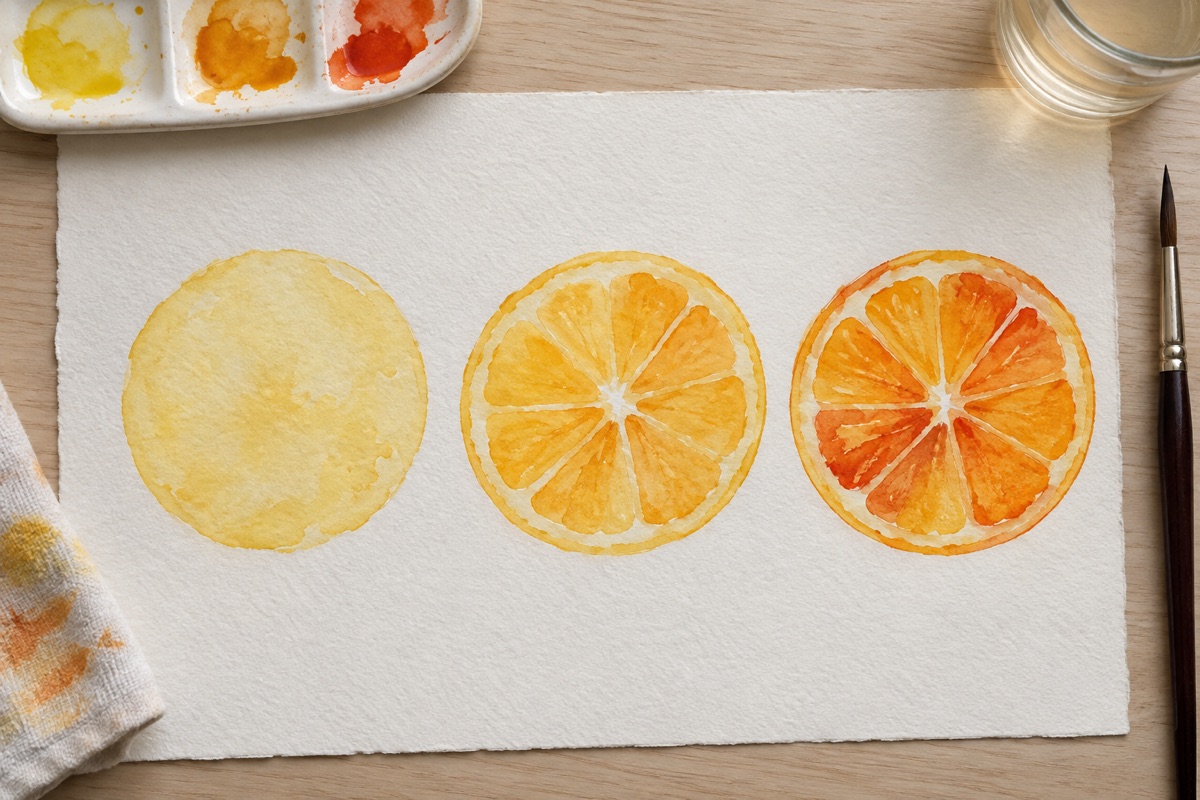
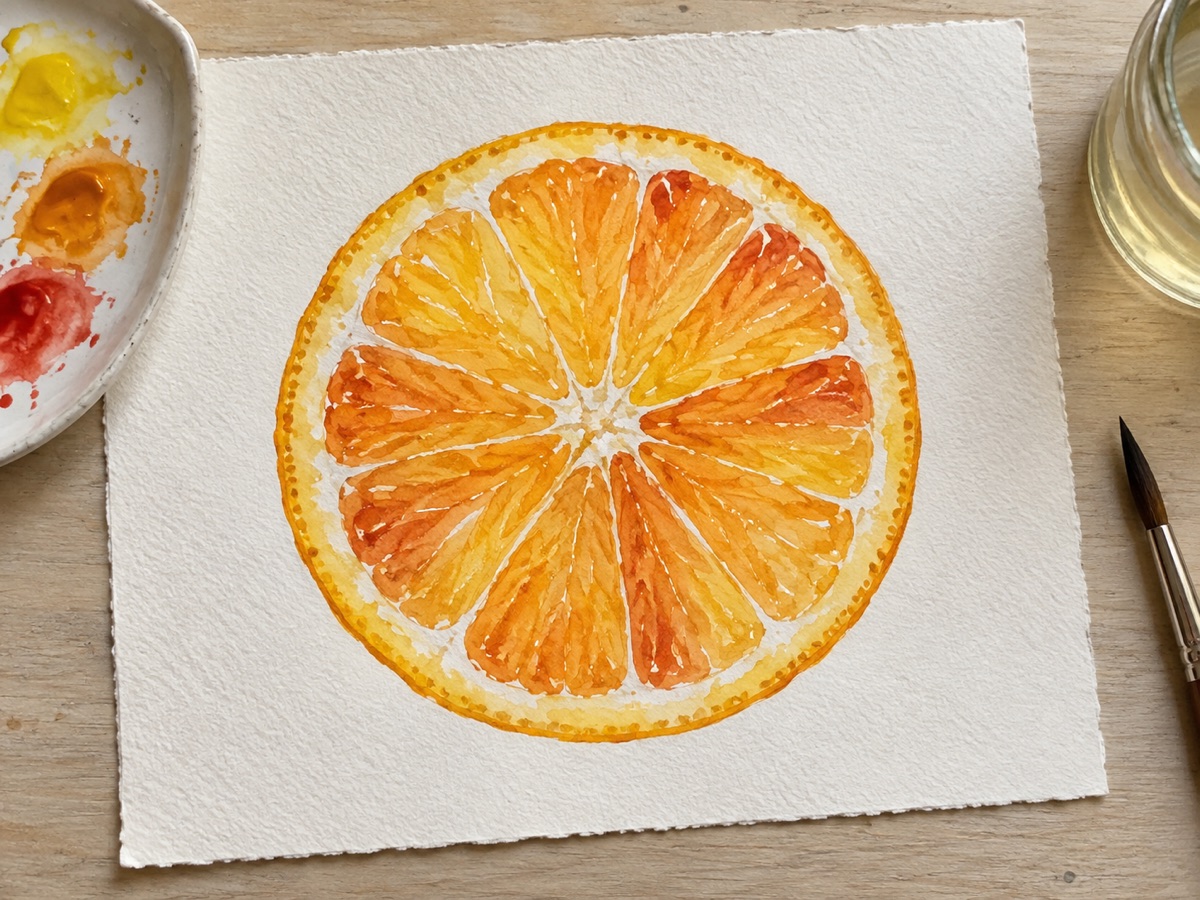
Failure mode and recovery: A chalky, streaked surface means the brush disturbed a layer that was damp or carried too little liquid. Stop and dry the page. Add one fluid 10:1 glaze across the affected wedge, then leave it. If the pith gaps close, lift a narrow line with a damp size 4 brush after drying, or widen only a few gaps so the pattern reads again.
14. Negative-painted wildflower for layered space
Things you'll learn: How repeated negative layers can reveal a pale stem and flowers while the background grows deeper around them.
Time: 60 to 80 minutes, including two long drying breaks.
Materials: 9 x 12 inch, 300 gsm cold-press paper; a size 10 pointed round and size 4 pointed round; Sap Green, Cobalt Blue, and Burnt Sienna; a simple wildflower reference, HB pencil, board, tape, and palette.
- Draw one connected silhouette. Sketch a stem, three small flowers, and a few leaves as one readable pale shape. Keep petals broad and avoid tiny gaps. A connected silhouette is easier to preserve through several background layers.
- Paint the first loose background. Wet the area around the plant until glossy, keeping the drawing dry. Drop in Sap Green and Cobalt Blue at 8:1, with a few 10:1 Burnt Sienna touches. The pale first layer establishes atmosphere without making every plant edge equally dark.
- Dry fully and paint a second negative layer. Use 5:1 mixtures around only selected petals, one side of the stem, and spaces between leaves. Leave some first-layer background untouched. Uneven darkening makes parts of the plant advance while other edges dissolve into the setting.
- Add minimal interior color. On bone-dry paper, glaze the flower centers with 10:1 Burnt Sienna and place a 12:1 Sap Green wash into two leaves. Keep most of the plant as paper. The reserved light is the technique's main effect, so interior detail must remain secondary.
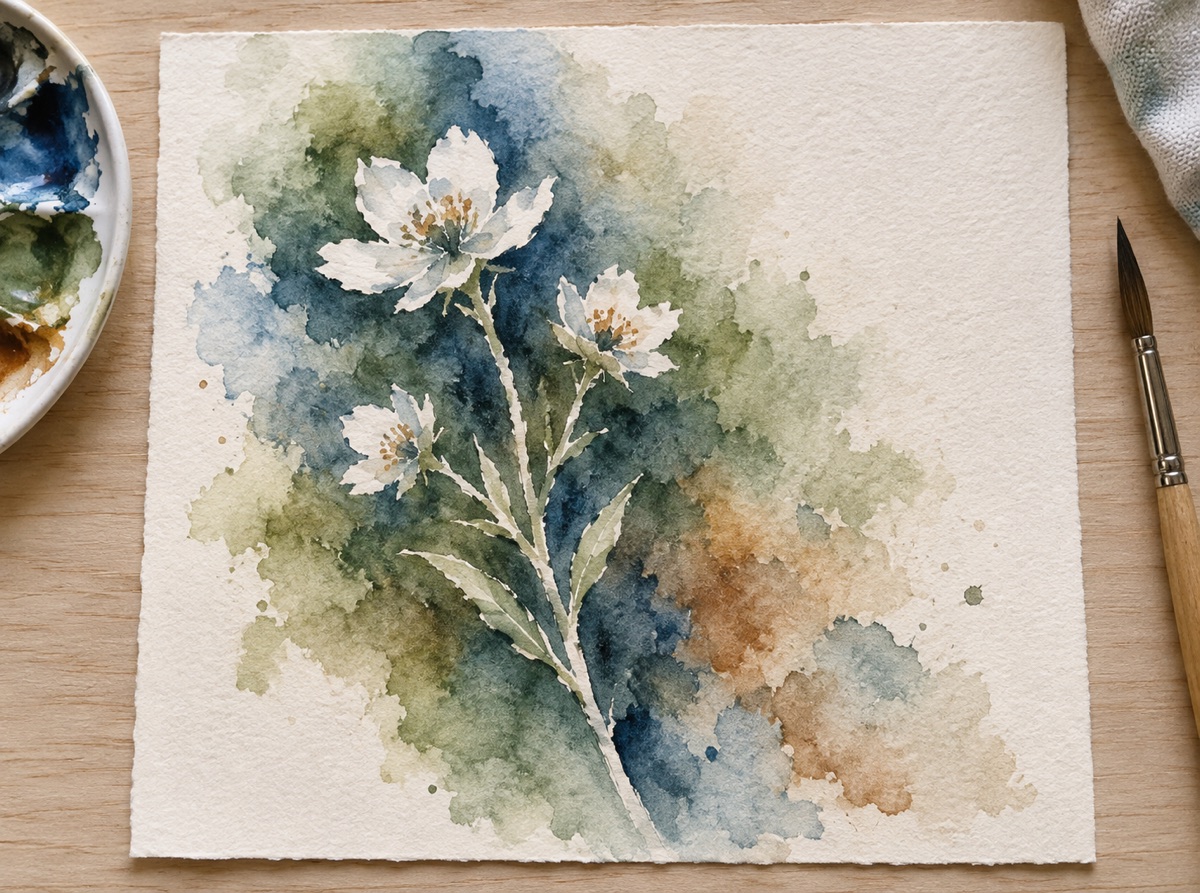
Failure mode and recovery: If the stem breaks where background paint crosses it, blot while wet. Once dry, reconnect the light path with gentle lifting and accept a slightly thicker stem. If the plant looks pasted on, glaze a very pale 15:1 Cobalt wash across one flower edge and the adjacent background. Losing one edge helps the remaining edges feel more natural.
15. Lifted rain window for selective highlights
Things you'll learn: How to lift narrow trails and droplets from a damp wash while keeping a soft scene visible behind them.
Time: 35 to 50 minutes, including drying.
Materials: 8 x 10 inch, 300 gsm cold-press paper; a 1 inch flat brush, size 6 pointed round, and small clean synthetic filbert; Indigo, Cobalt Blue, and Burnt Sienna; paper towel, palette, board, and tape.
- Paint a soft background on damp paper. Wet the sheet evenly, then wait until it is satin-damp. Suggest a low horizon and two or three blurry vertical shapes with Cobalt Blue and Burnt Sienna at 10:1. Damp paper keeps the background out of focus, which allows the later rain trails to sit visually in front.
- Cover the sheet with a blue-gray veil. While the background remains damp, sweep a 7:1 Indigo and Burnt Sienna gray across it with the flat brush. The paper should look evenly moist, not puddled. This unifying layer supplies pigment that can be removed for highlights.
- Lift vertical trails at the right moment. When the shine becomes satin, rinse the filbert, blot it firmly, and pull several vertical paths through the wash. Rinse and blot after every stroke. A merely damp brush absorbs pigment; a wet brush deposits water and creates uncontrolled backruns.
- Add a few droplet ends after drying. Use a 2:1 Indigo mixture to place a small dark bead at the bottom of selected trails, leaving a light center. These accents clarify the window effect, but limiting them prevents every lifted line from looking identical.
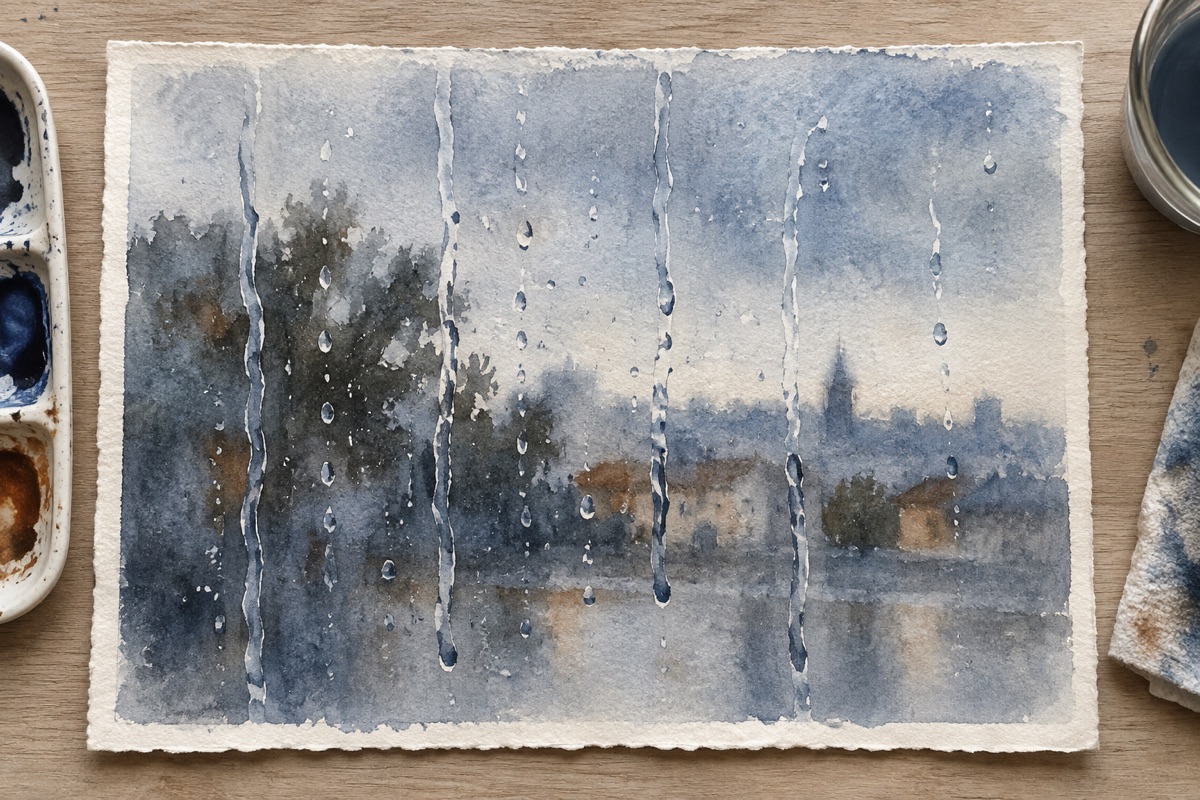
Failure mode and recovery: Trails that immediately close were lifted too early. Wait another minute, clean the brush, and repeat once. Hard pale stripes with frayed paper mean the wash was too dry or the brush scrubbed. Soften one side with a clean damp brush, then add a few darker droplets so the variation reads as rain rather than correction.
25 more watercolor painting ideas for quick practice
The 15 projects above are designed as full lessons. These next 25 ideas bring the total to 40 and work better as warm-ups, sketchbook pages, or subjects to revisit after you have practiced the related technique.
Water and pigment experiments
- Monochrome value composition - turn five strengths of one pigment into an arrangement of overlapping shapes instead of a conventional value strip.
- Masking-fluid constellation - reserve small stars and one larger moon, then float a dark blue-violet wash around them.
- Backrun bloom garden - place clean-water drops into a half-dry wash and use the resulting cauliflower edges as loose flower heads.
- Single-stroke reeds - load a pointed brush once for each reed and vary pressure from the base to the tip without correcting the mark.
- Pigment personality chart - compare one granulating, one staining, and one easy-lifting pigment on the same rough paper.
Botanical and natural subjects
- Loose eucalyptus branch - repeat simple oval leaves while changing their angle, value, and blue-to-green balance.
- Single wildflower stem - keep the stem narrow and let two or three soft petal shapes carry the subject.
- Mushroom cluster - use warm earth colors and overlapping cap shapes to practice lost and found edges.
- Berry branch - repeat small circles against a pale wash, leaving a pinprick of paper white on selected berries.
- Succulent rosette - build the plant from broad outer leaves toward smaller, darker center shapes.
- Seashell study - use curved bands and a few lifted highlights to describe form without outlining every ridge.
Landscape and weather ideas
- Single horizon study - divide the page into sky and land or water, then test how a high versus low horizon changes the mood.
- Tree silhouette against a graded sky - keep the tree almost detail-free so the value contrast does the work.
- Distant tree line - make each receding row lighter, cooler, and less detailed than the one in front.
- Foggy field - use low-contrast bands and soften nearly every edge except one restrained foreground accent.
- Sunset reflected on water - repeat the sky colors in shorter, slightly darker horizontal marks below the horizon.
- River bend - let one widening curve lead from the distance into the foreground without outlining both banks evenly.
- Storm sky study - push the darkest cloud value near one preserved light opening and keep the land simple.
- Snow field with one fence post - let white paper dominate and use one dark vertical accent to establish scale.
- Breaking-wave crop - paint only the curl, foam, and nearby water rather than a full beach scene.
Abstract and sketchbook prompts
- Two-color field wash - choose neighboring or complementary pigments and study where their meeting edge stays clean or turns neutral.
- Masking-tape geometric resist - cross the page with a few tape strips, wash over them, and remove the tape only after the paper is dry.
- Splatter-and-line map - organize random droplets with three deliberate paths drawn in waterproof ink after drying.
- Memory landscape - paint a place you remember without checking a photograph, keeping only the shapes and colors that stayed with you.
- Daily palette diary - record the day's two or three leftover mixtures as a small abstract square and repeat for one week.
Watercolor video tutorials worth watching
Still images show the target, but timing is easier to understand when you can watch the paper lose its shine. These two tutorials pair well with the exercises above:
- How to use watercolor: wet-on-wet, wet-on-dry, and a landscape tutorial is useful before the wet-on-wet wash, graded sky, or mountain study.
- Negative leaf painting in watercolor shows the order of background layers for the negative-painted leaf and wildflower.
Watch once without painting. On the second pass, pause at the moment the artist checks the paper sheen. That timing cue matters more than copying the exact subject.
How to pick one idea instead of overplanning
Use the condition of the paper as your filter:
- Choose glossy paper for wet-on-wet wash, clouds, or salt texture.
- Choose satin-damp paper for lifting, wet-into-damp leaves, or granulation.
- Choose bone-dry paper for glazing, negative layers, dry brush, or three-value mountains.
If you have only 20 minutes, paint the graded sky. Mix enough color before the first stroke, dilute it row by row, and leave the last five minutes for the page to settle untouched. If you want a subject, paint the botanical leaf. If you want to learn the most about timing, choose lifted clouds or salt texture.
If the problem is broader and you do not know what to paint in any medium, use What Should I Paint? A Decision Framework for Artists to choose a subject before you choose a technique.
Finished the painting? What to do with it
Watercolor leaves the paper itself visible, so the mat and wall can change the balance of a finished piece. In the WallMockup editor, compare a narrow white mat with a wider one and watch what happens to the painted-to-unpainted ratio. This is more useful than cycling through attractive rooms without checking scale.
That step can also help if you plan to sell prints or the original. A buyer may be asking whether the work fits a particular wall, and a scaled mockup gives them context before they have to ask. See why realistic mockups increase art sales for the presentation decisions that matter most.
See also: The Complete Guide to Wall Art Mockups for how presentation fits into finishing, photographing, and selling a piece.
FAQ
What is a good watercolor painting idea for a total beginner?
Start with a single wet-on-wet wash or a gradient sky study. Both use minimal brush control and teach you how water and pigment behave together before you add subject matter into the mix. For daily practice, keep it just as small - a single leaf or a five-minute cloud sky - since the goal is repetition, not a finished piece every time.
Do I need expensive paper for these watercolor ideas?
No. Student-grade cold-press watercolor paper is fine for practice and most beginner techniques. Save higher-cost paper for pieces you plan to keep, frame, or sell.
How do I make my watercolor paintings look less muddy?
Muddiness usually comes from overworking a wash or mixing too many colors on the paper. Limiting yourself to two or three colors per painting, and letting layers dry between glazes, keeps colors cleaner.
Can watercolor paintings be sold as prints?
Yes. Watercolor's texture and paper grain often photograph or scan well, and a true-to-scale room mockup helps buyers judge size and color in a way a flat scan alone doesn't.